Showing posts with label decorations. Show all posts

Wednesday, May 9, 2012

Baby's Room Redo

the Grant Life


 We live in a large house for three people.  Six bedrooms, three baths.  We got a great deal on the house and wanted to buy some place that we could grow into, rather than have to move again in a few years as our family grows.  It's been great!  My hubby has his man cave, I have my sewing room, we have a toy room/guest room, and another guest room.  We're often known as Hotel Fifield because of the steady flow of family and friends staying with us for a night or two.

In the three years that we have lived here I have only painted one of the rooms.  The baby's room.  It was the first thing I did after I stopped working full-time when I was pregnant.  The room was cute before, it just wasn't...us.  Does that make sense?  It had wide yellow and white stripes painted on the walls, with a border of bears.  Cute, but not us.

Good view of the stripes

Close up of the bears.  They were stickers that we had to peel off and
remove some glue residue.


So my five month pregnant self and my mom attacked the room with Behr's Paint and Primer.  I knew I was having a little girl, but I wanted something that could work for a boy or a girl.  This room will always be "the baby's room" because of it's proximity to our room.  So if baby #2 or #3 ends up being a boy, I didn't want to have to repaint it because it was overly feminine.  So I went with a baby blue and brown color scheme and "girled" it up by adding flowers and other feminine things.


The flower hanging rack on the door came from Real Deals.  It was red, so a little brown spray paint helped it fit into the decor.  The lamp came from a dollar store, and I already owned the picture of Christ holding the little child.  The dresser was one my mom had used for us as kids and was storing.  I gave it a fresh coat of paint and new hardware, and voila!  I had a new dresser.  Ya gotta love furniture made out of real wood.  It lasts FOREVER and your do so much with it!


I already had the teddy bear and lights.  I had bought the lights years ago for the first house I owned in 2005.  I planned on making one of the rooms in the house a library and wanted the cute lights in that room.  They never got hung up in that house, but I love them for the window decoration in the baby's room!

This photo was taken before I had the decorations up on the wall.

I bought the crib and bedding at Target.  I was so excited when I found bedding in the colors I wanted that wasn't meant exclusively for boys.  Yay for polka dots!  The blue baskets under the window came from Shopko, and the cubbies from Target.  As the room slowly came together I was more excited all the time.  Both for the room AND for the baby that was on the way.


I came up with this wall art using cheap wood products from Joanns and Michaels.  The flowers had stems on them that I cut off with a little saw, then I glued them to a thin piece of wood that I attached to the back of the frames.  I painted everything before I put it together using the sample paint I had bought for the room.  I think I figured that all four pieces cost a whole whopping $12!!  I felt really good about this creation and the little bit of money I put into them 


My hubby got me lamp complete with a dimmer switch for Mother's Day just before our little one made her grand debut.  The chair was another Shopko buy, and I love it!  It was the perfect cozy set-up for those LONG nursing sessions.


And finally here's her crib and decorated wall!  The flowers came from Ikea, and are actually lights that you can plug in.  I've kept the cords up in the flowers so far so I didn't have to worry about her getting tangled up in them.  Sometimes I have to remind myself that safety is more important than appearance!

I ordered the letters for her name from an online site than spray painted them brown.  It was so long ago I have no idea what site I got them from, but I love 'em!

There you have it.  My little girl's room redone so it now fits "us" a little bit better.  She's now almost two years old, and I still love her room.  To me that's a good sign when a room's decor can withstand the test of time!


Tuesday, March 20, 2012

Spring Bunting


Back in December I made a decorative ladder and had it all decked out for Christmas. Loved it! In fact I loved it so much I decided to leave it up and find ways to decorate it throughout the year. So in January I made some fun photo letters spelling out "FAMILY" and they are now hanging on it.  However, every time I pass it I can't help but think it needs something else.  So in February when I made my scallop bunting it finally occurred to me that some sort of bunting would be a fun addition.


The project was added to my ever growing "to do" list (thank you blog stalking and Pinterest).  Every once in a while I'd set out different fabrics and play with them.  I'd leave a grouping out on my work table for a few days to see if I liked them together.  Then last Friday I stopped in at a quilt shop and found an adorable fat quarter (it's the flower print).  It went with one that I already had at home, so of course I had to get it!  It didn't take very long for me to realize that this was going to be the fabric grouping I wanted for my bunting.


I still had several projects I was mid-way through so I didn't have plans on doing it any time soon.  However yesterday morning when I woke up at 6:30 (ugh!) and couldn't go back to sleep, I decided it was the day!  So I spent an hour and a half working on it before my little one woke up.  During that time I managed to make a template, cut out all of my fabric, and get all my triangles sewed together.  Yay!


Once nap time came I set to turning and pressing the triangles and sewed them into the bias tape.  I love when I have a project I can start and finish in one day.  Only, I didn't REALLY finish it one day...


Today I excitedly went to hang my bunting, and came upon a problem.  I went across the ladder once, good.  Then I went to switch directions and go back, and UH OH!  By sewing all of the triangles on facing the same direction it didn't allow me to change directions as I crossed back and forth on the ladder.  Some of the triangles would be backwards.


Sure I would have never had this problem if I had made the triangles double sided.  But I wanted some of the cute prints left over so I used a neutral color on the back.  Grrr...

I ended up unpicking four of the triangles and turning them the other direction.  Problem solved and it only took me about 20 minutes to fix.  I guess that's minor compared to other mistakes I've made!


And I love this addition to the ladder!

Saturday, March 3, 2012

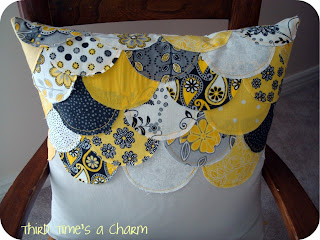
Clam Shell Pillow

Another Curves Class project!!  This one took a little more time, but mainly because of all the cute little clam shells I had to cut out.  I did this one in yellows and grays like the bunting so I can use it in my little girls room.  


It was a little tricky sewing the clam shells together.  You had to have everything lined up just right to sew each shell to the stem next to it.  But very fulfilling once I got it!  


I'm thinking some day I will make another one, but larger (18" maybe...) to go in her room as well.  I have a water bed frame-turned-bench that I'm refinishing for her room right now.  I plan on putting some cushions on it with some of these cute pillows!  Watch for the bench.  Someday I'll have it finished and blog about it.  Someday... :)


Check out Rachel at Stitched in Color.  She's the one teaching the Curves Class.  And check out the other projects I've blogged about from the class!


Monday, February 20, 2012

Pro Deo Pro Patria


My hubby bought this painting for me several years ago for Christmas.  It's one of my favorites.  It's been hanging on our wall ever since, but recently I've been trying to do more decorating around it.  I'd seen several projects were people secure a few boards together then paint a saying on them.  I liked the look and the project seemed easy enough so I thought I could do one to go with the painting.  However, I couldn't decide on a saying.


One day, like a flash of inspiration, it hit me.  "Pro Deo, Pro Patria"  As I've mentioned before my husband is in the military and this saying is his unit's motto.  It means, For God, For Country.  It's perfect for this painting!


This was an easy enough project.  I used boards that my husband brought home from work.  They were just throwing them away.  I used left-over stain from the chair I refinished.  All I had to buy was the mending plates to secure the boards together, 12 screws, the white paint, some letter stencils, and stencil glue.  I'm not lucky enough yet to own a Circuit or Silhouette, so I have to rely on the old fashioned type of stenciling. :)

Let me say I forgot how much I dislike stenciling.  I stink at it!  At first I just taped the edges of the stencils and used acrylic paint.  BIG MISTAKE!  I had major paint bleed.  I tried scraping and a few other things to fix it, but it wasn't working.  So I resanded the board and restained it.  I wasn't about to make that mistake again so I bought some stencil paint (it has a creamy texture) and stencil glue.  So much better!


I still had a few places where I got paint outside of the stencil, but nothing like the paint bleed I had before.  On the places where the paint was light I was able to put a little stain on a cloth and rub it over the paint.  It covered it up great!  Then on the places where there was thicker paint, I would put some stain over it, let it sit a few minutes, then rub with the cloth to blend it in.  I was so happy it actually worked!  There are still a few places where there is faint paint, but nothing bad!


Now my sign is happily setting above my George Washington painting.

Happy President's Day everyone!

Saturday, January 21, 2012

Lovely Photo Letters

After I saw Tatertots & Jello's tutorial on making a decorative ladder, I really wanted one.  So I made one!  Her tutorial is great, but as always I managed to make things more difficult than they needed to be.  So I added my lessons learned to my own post on my ladder making experience.  I used it to display Christmas cards and photos from past Christmases during the holidays.  I loved it!

But then the holidays were over.  What to put on it next?

Then I saw a guest post on Tatertots & Jello by Stacie from The Three Sweet Peas and I knew what I wanted to do.

Her tutorial was on how to make photo wall art using your printer, regular printer paper, tissue paper, a little Mod Podge, and wood letters.  Genius really!

This is what you get...


And this...

This is my favorite

And the whole thing...


So much fun!  I already love decorating with photos, and this was a great change from my everyday photos in a frame.  I think photos could look great printed like this and displayed in different ways too.  I'm playing with a few.

While doing this project I learned two tricks:
1. My printer wouldn't feed the tissue covered paper through the top feed.  I had to put it in the tray.
2. After I drilled my holes to hang my letters, some of them were hanging more skewompous than I wanted.  So rather than drilling a second hole, I used strips of magnets with sticky backs.  I just placed little pieces on the sides that were hanging too high, and ta-daa!  It balanced the letters and fixed my problem!  No one even notices.

Now on to other projects.  I couldn't sleep last night, and in my sleepless tossing and turning I started to come up with plans on how to make your own decorative shelf ladder - something like this...

Photo from hahoy.com

If I can make it work I'll post a tutorial on here.


Saturday, November 19, 2011

Christmas is Sneaking in...

I love - L.O.V.E - Christmas.  There are years when I start listening to Christmas music as early as August, because one month of it just isn't enough.  This year I resisted until Halloween day.  That's good for me!


The last few years on the day after Thanksgiving my husband and I have gone and tromped through the mountains and cut down our own Christmas Tree.  He's not big into Christmas so it's been a good way to create a tradition that we both enjoy.  I then spend Saturday decorating the tree and the house.  This year I couldn't wait that long so Christmas has slowly been sneaking into the house. :)


Here's a centerpiece I just created.  My mom gave me the lamp a while ago - I think it's from Lillian Vernon.  I bought the glasses from the DI (a local secondhand store), and the poinsettas from Joanns.  I also had the tray sitting around.  I saw a tutorial on tatortotsandjello.com on how to make a centerpiece tray from bead board and molding, but I lucked out and already had one on hand.  What do you think, do you like it?  I'm still trying to decide.  The pine cones are the cinnamon ones so my kitchen smells YUMMY!


The two pictures above are of my mantle.  I still might add a thing or two.  How do you like the flag?  My husband doesn't give much input on decorating, but he likes to have the flag on the mantel.  I can't say I blamed him.  It's well earned!


And here's a simple shelf.  I made the Joy at a church event and got the lantern at Shopko.  Love the lantern!

I also got out our Fischer Price Nativity Set and Rudolph the Red Nose Reindeer characters for the little one to play with.  She's loving them!! 

Merry Christmas!