Wednesday, January 18, 2023

Universal Orlando: What We Learned

We recently went to Universal Orlando, and since getting back have had three friends ask us for information. I decided it would be easier to type it up here, rather than constantly sending a jumbled mess of texts. Maybe one day I'll come back and pretty this up, but for now I just want to get the information down.

To Disney or Not to Disney

Initially, my plan was to spend one day in Disney World (had to get in the Tower of Terror and the Star Wars attractions), and two days in Universal. My husband is military so we can get discounts. That one day in Disney was still going to cost our family over $600. Ouch! Then I learned that Universal Orlando has an amazing annual pass for military families.

I also talked to several people who had done both Disney World and Universal. The general consensus was that they preferred Universal Orlando to Universal Hollywood, and that they preferred Disneyland to Disney World. I have been told that the parks of Disney World are so spread out that park hopper tickets are not worth it. I was also told that the Wizarding World of Harry Potter is much more impressive in Orlando.

So all things considered, I dropped the idea of Disney World and decided we would just do Universal and some beach days.

Before You Go

Harry Potter Wands
Ask your friends if they have one of the magical Harry Potter wands they would let you borrow. The wands are pricey (about $65 in December 2022). Sure they are fun while you are there, but once you are home they are just an expensive wand. We did buy a family wand, but we also borrowed one from a friend.

Download the App
The app is fantastic. It has maps of the park that you can filter what you see. It lists the ride wait times. It contains lists park hours. You can download your passes to it. You can order food through it. Some of the food places let you order your food, find a table, put down what table you are at, and then they bring you your food about five m minutes later. It was fantastic.

Hotels
I originally had us booked at a non-Universal hotel. Then I learned that Universal's Endless Summer Resort - Surfside Inn and Suites was just slightly more expensive and had some great perks. I quickly switched my reservation. Here are the main things we gained by switching.

Free Shuttle to the Parks: This was big to me. Parking at the parks was going to be about $60-$70 a day. The shuttle would save that price, and it would also give us some flexibility. It made it easy for my husband and I to divide and conquer with the kids. My 12-year-old and I would go early, while the others slept in and joined us later. Whoever needed a mid-day break could go back to the hotel. It just made it so much easier to cater to everyone's desired schedule and keep people happy.

Early Entry:  This was huge. When we were there we could go into Islands of Adventure an hour early. The rides that were open were the Velocicoaster, Harry Potter's Forbidden Journey, Flight of the Hippogriff, and Hagrid's Motorbike Adventure. We were there at a time that was not that busy, but Hagrid's was almost always a 90 min + wait. We would get to the gates 45 minutes before the early entry opening. The gates would open 15 minutes before. We would go in as fast as we could and head to the right through Suessland. You need to show the park staff your room key at one point to prove that you are eligible for early entry. Then we would rush to the line for Hagrid's. One time we were the second group in line. It was great! We were off the ride shortly after the early opening time, and then we could explore Hogsmeade or go on one of the other rides. It was also fun to get to see Hogsmeade empty without all of the people.

Hotel Amenities: 
The hotel has two good-sized pools. My kids enjoyed exploring both. There are laundry mats on some of the floors. They were a little pricey, but it was nice to not have to pack as many clothes. There is a cafeteria-style restaurant that was reasonably priced. The kid's plates were often enough food for even me. 

The rooms were a 2-room suite. They had a separate room with a queen bed, a small closet, and a TV. There was a bathroom vanity are with two sinks, and the toilet/tub were in a separate room. There was a small kitchen area with a mini fridge and a microwave. There was also a table that could seat about four around it. There were A LOT of shelves in this area, that made it convenient for storing food. I went to Walmart the first day we got there and got simple easy breakfast and lunch items. It made it nice to have a small quick breakfast before heading to the park. Then there were two other queen beds and a TV. 

Planning Dates
I used undercovertourist.com's crowd calendars when I was picking our dates. It seemed like they were fairly accurate.

Food in the Park

My kids actually did better with the food in Universal Orlando than they do with Disneyland. We found more options that they liked and would eat. We never carried a meal into the park. The shuttle made it easy to go back to our hotel for lunch. There are lockers that you can rent when you go into the park if you want to bring a little food, but don't want to carry it around.

Turkey Leg - this was available at several places and they all liked it.
Rotisserie Chicken - again, this was at several places, and it was probably their favorite.
Tacos - there is a taco truck in the Simpson's area that had some pretty good street tacos. Not all of my kids tried it, but I'm guessing my pickier eaters wouldn't have liked it.
Burgers - I know my husband and oldest got a burger in the Jurassic Park area one day and said it was pretty good. 
Butterbeer - we tried almost every variety of it. Regular, frozen, hot, ice cream...it was all good! I think most of us would say the Hot Butterbeer was our favorite, but it isn't available all times of the year. My husband and I would usually share one, because it was a lot of sugary sweetness.

Tips On Where to Get Butterbeer: 
Ice Cream: 3 Broomsticks and Florean Fortescue's Ice-Cream Parlour
Hot Butterbeer: 3 Broomsticks, The Leaky Cauldron, and there was another place across from the bathrooms by the stone umbrella. I don't know what it was called, but it was never busy when we went.
Cold Butterbeer and regular Butterbeer: I'm pretty sure you can get these at about any of the Harry Potter food places, including the Butterbeer stands outside.

3 Broomsticks: A tip on the 3 Broomsticks. It was really fun to go in and see it, and the food was good. However, if you see a line outside, and they tell you it takes about a half hour to get in, know that there is ANOTHER line once you get inside. 

Other Food
Simpson's Large Donut: It was plenty for our family to share. It was decent, but not a must-have in my opinion.
Pumpkin Pasties: Decent if you like pumpkin.
Peppermint Frogs: These were pretty tasty.
Shakes: We got shakes from the Chocolate Emporium in City Walk. They are pricey and very sweet. We shared two among our family of five and it was plenty. They were good!

Park Hopping

If you want to ride the Hogwarts Express you need to have Park Hopper tickets. You will need to show your tickets every time you get on the Hogwarts Express. So if you plan on your group splitting up, then someone in each party will need to have tickets for everyone. I had the app on my phone, and my husband had our paper tickets. You could also have multiple people in your group download the app.

City Walk

I have been to Disneyland multiple times, so I tend to compare Universal Orland to what I know from Disneyland. To me City Walk is comparable to Downtown Disney. There are several restaurants and shops. You have to walk through City Walk from the shuttle drop-off/parking are to get to the entrances of Islands of Adventure and Universal Studios. It is at least 1/4 a mile.

The Rides

Here is my take on the rides we did. There are several of us that get motion sick from spinning rides or rides with a lot of videos. So I'll be mentioning which ones made us nauseous. We didn't go on every ride, so if I do not mention a ride it is most likely because we did not go on it.

Island of Adventures
Doctor Doom's Fearfall: This is comparable to Guardians of the Galaxy/Tower of Terror. However, I felt like it shot up a lot faster. It was fun!
Popeye & Bluto's Bilge-Rat Barges: This is similar to Grizzly River Run in California Adventures. However, with this one you WILL ABSOLUTELY get wet. Most likely drenched. If you don't want to get soaked, wear a cheap poncho or don't go on it. 
Skull Island: Reign of Kong: This reminded me of Indiana Jones. You are on a bus on tracks that shakes, shifts, and tips. You go through scenes and videos that tell the story.
Camp Jurassic: This is a big playground area made up of rope bridges, stairs, and areas to explore. My nine-year-old loved it!
Jurassic Park River Adventure: This one reminds me of Splash Mountain. You go through a calm river at first, and then it ends in a big drop. The boats sit about 5 people across and have one common lap bar. My girls didn't like the common lap bar, because it meant it wouldn't go snuggly on their little legs so they felt a little insecure.
VelociCoaster: This is quite the thrill! It was fast, it lasted a decent amount of time, and it took some guts to go on!
Harry Potter and the Forbidden Journey: This one goes on a track, tilts, turns, and moves in other directions, and has sections of video. This one made several of us sick, which is a shame because the line goes through Hogwarts, and had a lot of fun things to see. My oldest went on it several times by herself and used the single-rider line.
Flight of the Hippogriff: This little roller coaster does not go fast and is VERY SHORT. So I would suggest not waiting in a long line for it. I wouldn't even wait 20 minutes for it. However, my younger kids loved it, and it had great views of Hogwart's Castle. We would usually go on it right after Hagrid's during the early hour because then we could walk right on it.
Hagrid's Magical Creatures Motorbike Adventure: Such a fun roller coaster! One of our favorites! My girls get a little nervous on roller coasters, but they watched videos of this one beforehand. Knowing what was coming helped them have fun. 
Hogwarts Express: The experience is a little different in both directions, so if you can ride it both ways.
Poseidon's Fury: One of Universal's staff said this was one of their favorite things. My 12-year-old and I went through it. It's kind of like a walk-through show/experience. Honestly, we found it a little cheesy.

Universal Studios

Despicable Me Minion Mayhem: I didn't go on this, but some of my family did. It sounds like it is a ride where you are in something that just shifts, shakes, and tips while you watch a video screen. It made my husband a little nauseous.
Race Through New York Starring Jimmy Fallon: This is another one where you are in something that shifts, shakes, and tips while you watch a screen. This one definitely made me nauseous, but my 12-year-old really liked it.
Revenge of the Mummy: A roller coaster with some video. This was another of my 12-year-old and mine favorites. However, if I went on it multiple times in a row I would get sick.
Transformers: The Ride-3D: This is another roller coaster/video ride. It's fun if you have a history with the franchise or love of it. It made me sick. 😆 Are you seeing a theme here?
The Night Bus: If there is an actor outside of it, it is fun to take a minute to stop and watch. The crowd can ask questions and interact with them.
Ministry of Magic Phone Box: You can go into the phone box and dial the special number to "try" to get into the Ministry of Magic.
Harry Potter and the Escape from Gringotts: This is another fun one that is part roller coaster, part video. It is a 3D ride, and I had a hard time keeping the 3D glasses on during the roller coaster part so I would hold them in my hand when I needed to.
Men In Black Alien Attack!: This is a really fun one where you get to shoot aliens as you ride. This was one of my 10-year-olds favorites. I've learned since going there that after you ride you can nicely ask the staff if a ride tour is available. If they aren't busy and have someone available they will take you to see parts of the line that you walk past but don't experience.
The Simpsons Ride: This is another one that you sit in a cart while it shifts, shakes, and tips, and you watch a video. You guessed it...it made me sick. My kids liked it though!
ET Adventure: This is what I consider a good ride for a break. It's dark, cool, not fast, and not too loud. However, I definitely would not wait in a long line for it.
Woody Woodpecker's Rollercoaster: This was another small roller coaster for younger kids.

A lot of rides do not allow bags on them. They have lockers nearby that you can put your bag in for free for about 30 minutes. However, you would have to get out of line to go put the bag in the locker. For that reason, we chose to not bring bags most of the time.

There is a dragon on top of Gringotts that shoots fire out of its mouth about every 10 minutes. My dragon-lover child was  SO EXCITED about this. It starts to make some gurgling noises before it emits fire.

There are about six mapped places that you can use your wand to interact with in Hogsmeade and in Diagon Alley. Some were more difficult to get to work than others. There are also a few secret ones. You can have a Wizard or Witch working in the area show you, or we just started looking for the red sensor lights and were able to find some on our own. The spots at the windows are often crowded, so it might be a good thing to do during the early hour after you go on a ride or two.

We did not pay for Express Passes, but were given a few single-use ones. While we were there most rides were short enough that they wouldn't have helped much. However, there were a few times they would have been nice to have. You cannot use them on some rides, like Hagrid's. Some of the nice Universal Hotels include Express Passes with your stay. If we go again I would price if it is worth staying one or two nights in one of those hotels to get the passes. Those passes are also closer to the park entrances. 

Wow. If you are still with me, good job! I hope this information helps you with planning your Universal Orlando trip! My kids loved this place and would definitely go back. They chose to spend 5 1/2 days in the park even though I kept offering to take them other places like the beach, Sea World, and Gatorland.


Sunday, February 3, 2013

Maternity Leave

Almost two weeks ago two angels joined our family.


Needless to say, this blog is going to take a back seat to more important things.  I may still manage to post about a few projects I've done recently.  But it's not a priority.  Snuggling these two little girls and their older sister is priority #1.  Sleep is definitely up there in the top five when I can manage it.


Thursday, January 17, 2013

Toddler Seat Cover

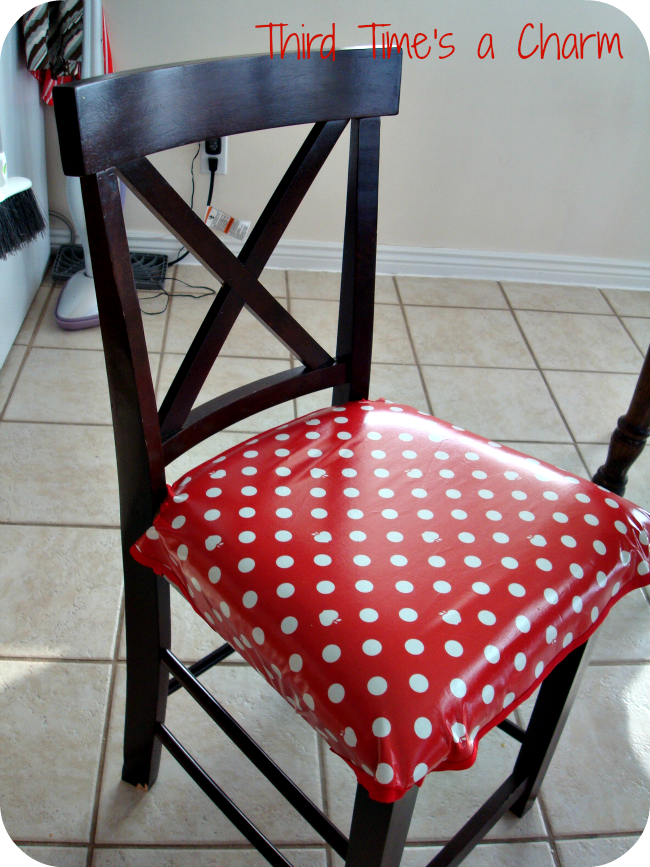
When we were looking to move our toddler out of the high chair, my hubby let me know he wasn't thrilled with the idea of booster seats.  He feels that they aren't that secure and safe.  His solution?  A bar stool with the legs cut down a little.  I was fine with the idea until I started pricing stools, particularly ones with backs.  Yikes!  They get pricy really quick!  Luckily I stumbled on a floor model that was on clearance and snatched it up.

The seat was covered in a micro-fiber like material so I thought it would work out great.  But we noticed it was staining easily and my mom warned me that it would looked well used very quickly.

Enter my husbands idea to make some sort of cover for it.  Of course it was one of those "WE should make a cover for it" statements that meant  "I should make a cover for it."  We'll just assume it was a manifestation of his confidence in my ability.


So I grabbed some PUL fabric on sale, and this is what I came up with.  The design is a combination of  my hubby's idea and my own.  It ties on all four legs, but also has flaps that are long enough to wrap around part of the bottom to be joined with a small bungee cord.  It's been in use for a few days now and it seems to be working out okay.


It stays in place, cleans up easily, and our little one seems to be happy with it.  Better yet, it was one of those one day projects.  Love those.


Wednesday, January 9, 2013

Toddler Quiet Book

Man!  Between the holidays and getting ready for these twins to come I haven't been spending much time on the computer.  And since the twins will most likely be making their grand debut in two weeks there's a good chance that it is only going to get worse.

I do still have some projects to share with you, so we'll see if I can't get one or two in before they rock my world.

Back in September a friend of mine organized 16 of us to make Quiet Books together.  The idea was we would each pick a page to make and we would make 16 of that page.  The organizer made sure nobody was duplicating pages, and was our go to person.  Once they were all made and turned into her, she divided them so that we each received 16 different pages.  Brilliant!  It was easier, faster, and cheaper to do it this way.

The goal was to get the pages to everyone in early December so that they could be put together for Christmas presents.  I decided that I would hold on to mine until the twins came so I could use it as something to help entertain my 2 year old when I have two new babies to take care of.


Here is my finished project finally!  I bought extra Pellon to make the front and page covers.  I covered them with some fun fabric and hand sewed on the foam letters.  I tried using my sewing machine, but I didn't like the look of it.  Of course!  Don't we all tend to prefer the look the more complicated methods give us.

I put some eyelets in each page then joined them with metal rings.  Even with 1 1/2 inch rings I couldn't fit all of the pages.  I figured I could switch them out every so often to help revive her interest in it.


There were some fantastic pages made: Barnyard Finger Puppets, Tic Toc Clock, Abacus, Match the Socks, and many more.  I decided to do the Peek-a-Boo Mittens page.  I'll be honest, I wanted to pick one that was cute, but not too difficult to do.  I'm still amazed someone chose to do the Barnyard Finger Puppets 16 different times.  Wow!


I wanted the kids to be able to put their hands in the mittens if they wanted.  So I made a few trial sizes and tested them out on my little one.  I wanted to embellish the mittens somehow, but again, didn't want to make it too time consuming.  So I chose a decorative stitch on my sewing machine and went to town.


Rather than buying photo pockets which were a little more costly than I liked, I cut page protectors down to the size I needed and sewed them on with a zig zag stitch.  I ended up getting four photo pockets out of one page protector.  Not bad, huh?


Then for the wording I didn't want to write "Peek-a-Boo" sixteen different times.  Lazy, huh?  So I used my method for printing Fabric Labels and printed it out on fabric then sewed it on to the page.


I finished it all off with some cute little snowflakes I bought from JoAnns and there you have it!  A fairly simple, but cute version of Peek-a-Boo Mittens.


I still haven't given the book to my toddler yet.  Hopefully it will provide hours of fun, educational play to help keep her entertained!

P.S. - If this post is full of typos, it's because I was playing pretend with fish, horses, cars, and ducks with my toddler as I typed it up.  Where would we be as moms if we couldn't multi-task?

Friday, December 21, 2012

Online Eyeglass Fun

The following is a sponsored post for GlassesUSA.com.

Glasses.  Me and glasses.  We don't go together very well.  I got my first pair when I was 16.  My mom's friend who worked for the optometrist helped me pick them out.  I was too young and impressionable to speak my mind so I ended up with a pair of eyeglasses that I wasn't crazy about.

When I was in college I eventually ventured out and bought me a new pair of glasses.  I LOVED 'EM!!  Unfortunately, I didn't own them for very long before I lost them when I was on a trip with friends.  I even went back to where I bought them from, but they had discontinued that frame.  Of course!

Then I became a mom and discovered that young ones can be brutal on eye glasses.  I don't know how many pairs I have gone through in the last two and a half years, but it's ridiculous!  Needless to say as a busy mom it's difficult to make it to an optometrist every time I need a new pair and EXPENSIVE.

This is when I discovered online eyeglass companies.  Sure it can be intimidating to order glasses online, but these companies are getting smart and have fantastic tools to help you virtually try on the glasses. Just check out the Virtual Mirror Feature from GlassesUSA.com.


I had a blast with it!


And this one had some features that were superior to other websites.  This one you can upload a picture and rotate it so your eyes are level as well as change the size of the image.  Some sites require you to use a photo you take with your webcam.  Uploading an existing photo was very desirable to me, as I'm not crazy about how my swollen pregnant face is photographing these days.


Another thing I liked about their site was the Virtual Optician that helps you select frames.  You can do it by frame features, measurements or your personality to help find a pair of frames you'll love!

And for you my dear readers they are offering some discounts. 

Take 15% off your entire order amount + FREE shipping (orders over $50). Code: FS15
Take 10% off any order of prescription glasses. Code: Blog10
Check 'em out and have some fun with the Virtual Mirror!

Thursday, December 20, 2012

Pretty Peasant Dresses


Are you familiar with the blog Sew Much Ado?  If not, you should be!!!  I have never bought one of her patterns before, but I have used several of her tutorials.  The tutorials are so fantastic, the quality of her patterns must be amazing.


I used her Infant Peasant Dress tutorial to make a few little dresses for the twins.  I love the simple design and the use of elastic.  It's going to make it ssssooooo easy to put these on and take them off!


I believe I ordered this material from Pick Your Plum when it was one of their daily deals.  It's one of those great sites that posts a new deal everyday.  It's often baker's twine, basic wardrobe pieces, blank jewelry or crafts.  When I decided to make these dresses and was digging through my material stash, these prints seemed perfect.  Adorable, but soft.  Something that won't over-power two little girls.


BTW - I'm not getting paid by Sew Much Ado or Pick Your Plum.  I just want to share two sites with you I love!

Thursday, December 13, 2012

Diamond Quilt

Threading My Way_Featured

Yay for another finished baby project!  I'm definitely in the nesting stage washing dozens of onesies, a bazillion baby socks, getting the nursery in order, and working frantically to make everything I want to for these two bundles of joy.

About six months ago I posted about the Zig Zag Quilt I had made.  Sure I intended to give it as a gift, but I just couldn't part with it.  I promise I tried!!  I even had my husband pick it up from the house one day and bring it to me when I thought we were going to see the lucky recipients.  He brought me the wrong quilt.  I think that was a sign.

Now that I have TWO babies on the way, I'm grateful I already had this one made so I could focus on making just one more and focus on the many other projects on my agenda.

Sister Quilts
I decided I didn't want to make the same quilt, but something complimentary to the Zig Zag Quilt.  So I started with some adorable polka dot and neutral alphabet fabrics.  I made the same amount of Half Square Triangles as the Zig Zag Quilt.  I then played around with the squares, coming up with half a dozen different designs.  It was difficult to choose a winner!


Eventually, after some Facebook votes I settled on this diamond design.  I'm happy with my decision and love how these two quilts go together.


I backed this one with cozy flannel, just as I did the Zig Zag Quilt.


For the quilting I stuck with the same idea of just quilting in the white squares.  After playing with a few quilting designs I decided to go with the double diamond.  I love the look on the front and back.


I tried something different with the quilting.  I wanted the thread to blend in on both sides, but I was quilting on white on top, and red on the bottom.  Yikes!  So I used red for my bobbin thread and white for my main thread.  I don't know why this has never occurred to me before!  I love how it worked out!

My ever faithful helper.

 Now on to baby dresses, afghans, receiving blankets....you get the picture.

Tuesday, December 4, 2012

Ladder Bookshelf Tutorial

Here it finally is!  I've been talking about this tutorial for probably 10 months.  Now the ladder's actually done, the tutorial is written, and the pictures and inputted.  I'm not sure what took more time, making the ladder or writing the tutorial!


One thing I am liking about this project is it's versatile. I could put books or toys on it, or use it to decorate.


Right now it's being used to display some Christmas treasures.  My little one has reorganized the shelves several times already...


For Halloween, I had it on my front stoop adorned with gourds and squash from our garden.  Talk about cheap decorations!


So now it's your turn!  Go crazy and make your own, add your own touch.  Hopefully this tutorial makes sense.  It seemed simple at the time, but writing it was a little more complicated than I thought.  Let me know if you have questions, but please be kind.

__________________________________

**Disclaimer** I wrote most of this tutorial as I made my own bookshelves.  However, I didn't write the section on putting it together until LONG after I had done it.  My memory was a little shaky, but I did the best I could.  Good luck, and let me know if you have questions!

Materials and Tools
1x8 boards
Plywood - I used 3/16 thickness, but this just depends on how thick you want your shelves
3/4" wooden dowels
8x2 wood screws
1/2" pipe straps
1/2" corner braces
small screws (I used 3/8" screws so that they wouldn't break through the top of my shelves)


Circular saw (or table saw if you're lucky enough to have one)
Sander
Drill(s)
Level
3/4" wood boring bit
Chinese Saw: suggested
Paint/Primer

Making the Frame

1. Prepare the wood
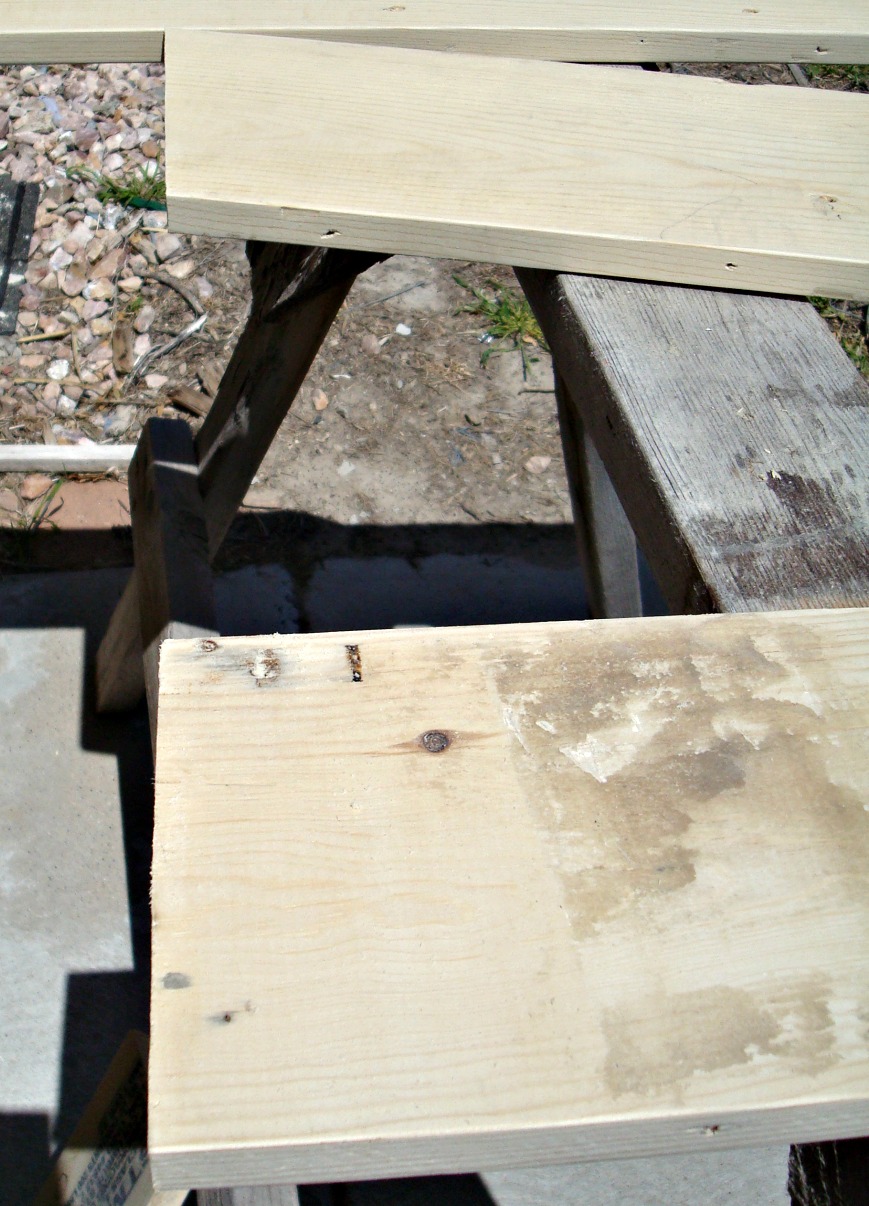
In my case this meant finding a way to get the packing labels off of the wood.  I found what worked best for me was scraping as much off as I could with a paint scraper, then using rough sand paper (a low grit) with my rotary sander.  I then sanded my boards with a finer grit sand paper.

Lovely packaging stickers on my boards.  Guess that's
what I get for using boards from a dumpster.
Scrape those suckers off!

2.  Lay out the two boards that will make one side of the ladder. Play around with the angle, until you find a position you like.  Mark the boards and use a circular saw to cut along your marks.  You will be cutting off the top of the boards.

Ignore the board the saw is on for now.  The other two show what it
looks like after I cut the top of one to even them up.
These pictures show how I laid my boards out to decide on an angle.  I drew a line marking where the boards overlapped.  I did not cut at this line, but used it as a reference when clamping my boards together for future steps.
Line 'em up!

Reference line.  Don't cut it!!
3.  Square up the bottom edge of the back support board by marking and cutting with a circular saw.  I had a square that I used to make my mark.

Use a square to mark the bottom cut on the back support board.
 4.  Clamp the two boards in place at this point.  Take a yard stick or long board and line it up with the bottom you just squared up then use it to draw a line on your angled board.  Cut along the line.

Top of boards clamped together.
Use a long straight edge, such as another board to mark the bottoms cut for
the front support board.
Both support boards of one side with their bottoms cut.

5.  With the boards still clamped mark where you want your top dowel to be.  I marked mine 3.25 inches in from the back board (the halfway point).  Use a 3/4" wood boring drill bit to to make the whole.  To ensure you don't drill too far use a piece of tape to mark on the bit when you should stop drilling.  I like to let the tip of my bit just barely break through my outside (bottom) board.  It provides a mark that becomes useful later in the process.

Marking the top hole.
Marked top hole.
3/4" Wood boring bit.
First hole for the dowel!

One side clamped into place showing top cuts, bottom cuts,
and top hole for a dowel.
6. Unclamp your boards and use them to mark your top and bottoms cuts on the second side, as well as the hole you made in step 5.  Cut along your marks.

7.  Lay out the second side of your boards (the one you just cut) and clamp then into place. Use the mark for the hole in step 6 to bore another hole using your 3/4" boring bit.  **NOTE** Make sure you have the correct piece on the bottom.  When I first did this I ended up with two left sides of my ladder and no right side because I drilled the whole with the wrong board on top.

8.  Decide how many shelves you want and how far apart you want them.  I decided on 5 shelves and marked them 12.5" apart.  Make your marks for the shelves on the inside of one back board.  I marked them 1.5" from the back side of the board, because I wanted to dowels further back.

Hard to see, but I promise those arrows are pointing to marks for drilling.
9.  Used the 3/4"boring bit to drill the holes.  Again, use tape to mark on the bit when you should stop drilling, and I also let the tip of the bit just break through the other side with these holes.

Several holes drilled.
10.  Flip the board from step 9 onto your other back board.  They should be mirroring each other.  You should be able to see the small holes from bit on this side of the board.  Use a long nail and hammer to puncture through the whole and mark your second board.

Marking the second board for drilling.  The top board is the one that already
has holes in it.  The bottom is the board we are marking.
11.  Remove the top board.  You should see small holes from the nail.  These holes mark where you will drill your holes using the 3/4" bore bit.

Boards with holes drilled so that they mirror each other.
12.  Cut your dowels.  Decide how wide you want your shelf and then cut the dowels approximately 2 inches larger than that.  This compensates for the part of the dowels that will be in the holes you have bored.  I wanted my bookshelf about 18" wide so I cut my dowels to 20" length.  I used a reciprocating saw to cut my dowels, but I've used a hand saw before.  If you are making five shelves like mine you will need 6 dowels.  Five for the shelves and one for the top joint.

13.  You're now ready to attach your dowels to one side of your ladder.  Put the top dowel through the inside board (angled board) and place the outside board (back board) on top of it.  Saw horses were very helpful for this step.  Then hold the dowel in place while drill a guide hole.  **NOTE**  DO NOT SKIP THE GUIDE HOLE!  This hole makes screwing the dowels into place MUCH easier.

Pre-drill that hole!


14.  Immediately drill a screw into the hole.  I strongly suggest drilling one hole, then putting the screw in, drilling a hole, putting the screw in.  This ensures your holes are still lined up.  I used two drills while doing this and it made life much easier.  Repeat this for all six dowels.

Dowels attached to one side.  Notice the two drills in the top right of the
picture.  Very helpful to have in this step!
15.  Lay the piece down on the ground with the dowels pointing up.  Find something about the width of the ladder to help support the inside board (angled board).  I used one of my tool cases.  Place the inside board in place - top hole through the top dowel and angled out.  Place the outside board (back board) on top of the angled board and resting on the dowels.

See the tool box helping support the front legs?   You can also see that
I am only lining up a few dowels at a time as suggesting in step 16.
16.  Start at the top and work your way down.  Only worry about lining up the dowel you are working on and the one after it.  Hold the board in place while you drill your guide hole, and place the screw.  Line up another dowel (two should be lined up) and drill and place the screw for the second hole.  Keep repeating till all six dowels are secured to the second side.

I suggest only lining up two dowels at a time as you will drive yourself crazy if you try to keep all of them in the holes before screwing any of them into place.

Cutting Out The Shelves
1.  Looking at your frame you'll see that there are two widths.  A more narrow part by the front angled supports and a wider part between the back boards.  You can make your shelves one of two ways.  A. All the same width using the distance between the two front boards.  B.  Each board has a section of two widths so it fits between the front boards and gets wider at the back boards.  I made mine using B, but it would be easy to adjust for A.

2.  Measure the distance between the two front boards and between the two back boards.  Mine measurements were:
Front Boards: 17.5"
Back Boards: 19.5"

3.  Cut your plywood into strips 1/4" less than your widest measurement if you are making shelves using Option B, or 1/4" less than your narrowest measurement if you are making shelves using Option A.  So I cut mine 19.25" wide.


4.  For each shelf measure the distance from the back of the ladder, to where the front and back boards meet and subract 1/4" (measurement #1), then from the back of the ladder to the front of the ladder (measurement #2).

Showing both measurements.
5.  For Option A cut the strip of plywood using measurement #2 only.
Option B: Using a yard stick mark you board at measurement #1 & #2.  I make about 5 marks so I can draw an accurate line using all of the marks.

For example for my second shelf from the top measurement #1 was 5.25" and measurement #2 was 12.25".

6.  On the width, mark a line 1" in from each side.

This shows all of my marks for steps 5-7.  I exaggerated them with a photo
editing program so you could see them.
7.  X out the section that is between the 1" line and the section between measurement #1 and #2.  This is the section you will cut out.  **NOTE** When you are actually cutting it can be easy to make mistakes and cut out the wrong section.  Marking X's on the cutout section help make sure you are making correct cuts and not wasting wood.

8.  When cutting out the sections, stop just prior to the point where the two lines will meet.  If you cut all of the way with the circular saw, you will actually make cuts into your board.

9.  Finish the cuts with some type of small hand saw.  I used the saw below.  My mom calls it a chinese saw, but I'm not sure if that is it's actual name.

This shows the partial cuts made with the circular saw.  I used that little
hand saw on top to finish the cut.
10.  Option A: repeat steps #4 and #5 for each shelf.
Option B: repeat steps #4-#9 for each shelf.

One shelf cut out using Option B!
11. Sand down your shelves using fine sand paper.

Priming and Painting/Staining
1. You are now ready to prime/stain your wood!

2. I took my top dowel out and removed my angle boards for painting and priming.  It made it easier to get all of the areas.  I had to loosen the screws on the second from the top dowel to be able to remove them.  It made painting much easier though!

I would love to see this stained.  My wood was too flawed for staining so I had to paint mine.


Putting it Together

1. If you've followed me up to this point, then your back support is already put together.  Remove the top dowel and reattach the angle boards.

Ready to assemble!!
2. Before proceeding to attach your shelves make sure your frame is setting exactly how you want it!  I had several shelves installed before I realized the frame wasn't completely extended out and so the legs weren't setting completely flat on the ground.

Frame ready for shelves.
3.  Set your shelf in place, partially supported by the dowel.  I suggest working top down as you will be working under the shelves, and this way the other shelves aren't in your way.

4.  Take one of you pipe straps and place it where you want it.  You will have two per shelf.  Mark where to drill your holes; repeat for the second pipe strap.

**Now is a time when it's handy to have two drills.  Have one set up with the drill bit, and one with the driver bit.  No switching bits back and forth.  Brilliant!**

5.  Drill holes.  (Don't you love simple steps like this!)

6.  Place shelf and one pipe strap in place.  Insert screws.  I like to start the screw with a screw driver, then finish it off with the drill when I'm working with such small screws.  Do the same for the second pipe strap.

Screwing pipe strap in place around the dowel.
7.  Place a level on the shelf and straighten it out.  Take one of your corner braces and place it where you would like it between the angle board and shelf.  Mark holes.  Repeat for the second side.

Pipe straps in place and making sure the shelf is level before marking
holes for the corner braces.
8.  Drill your holes, then attach the corner braces.  Again, I found it helpful to start the screw driver.

Attaching the front corner brace.  You can also see the pipe strap in back.
I had lots of "help" on this project.  From my little one
and the dog...
9.  Repeat steps #3-#8 for each shelf.

Voila!  You're own ladder shelf that you can brag you made yourself!