Tuesday, February 28, 2012

Rainbow Road Table Runner

Seven Alive


All right!  Time for another post from a Curves Class project!  This one is called Rainbow Road.
Some of my favorite prints
When I first started into this class my goal was to use material from my stash, especially for the smaller projects.  So when it came to Rainbow Road I pulled out a charm pack I had on hand.  I loved some of the prints in the charm pack and thought one day I would use them elsewhere.  On the other hand, some of the others were a little wild for my tastes.  I took a leap and just sliced them all up for this project.  I'm not always big on the super colorful, super scrappy look so this was definitely a leap for me!


Sometimes I look at it and think, "I love it!"  Other times I think, "Woh!  What did I do?!"
Look at some of those crazy prints!
I think I'll get used to it.  This was another great way to practice Improv Curves.  I'm surprised at how much I liked improv curves.  I'm usually a very structured, give me a pattern kind of person, but I LOVED the freedom of these curves.  Cutting without a ruler, no pinning, just going with it!  Those are things I never thought I would be comfortable with.  What a nice surprise!!
Cute cheerful back with a better look at the quilting
This little table runner will be a cheery addition to our table for the spring.


Other posts regarding curves projects can be found at the following posts:
Scallop Bunting
Bibs
Quilt Cards

Monday, February 27, 2012

Bloglovin'

So I've now joined the Bloglovin' band wagon.  I still have GFC AND Linky Followers, but I may be getting rid of Linky Followers.  My stats have been out of control since I joined LF, which I would love if it were real but I'm skeptical.  My stats in my Blogger Dashboard are no where close to what Google Analytics is showing.  So if you are following via LF, I'd love for you to switch over to Bloglovin'!

Follow my blog with Bloglovin

And as always, thanks for stopping by!

American Crafter


All right, I did it!  I keep seeing the American Crafter button all over and people saying that they entered.  I had no idea what it was so I finally went to check it out and I entered.


So you'll find my Dandelion Daydream Apron over there.  I'd love for you to head on over and cast a vote, but only if you want to of course!

Sunday, February 26, 2012

Mommy Blog Hop Sunday

This is part of the Mommy Panel I'm participating in.  I'd love for you to join the fun!
---


Saturday, February 25, 2012

Quilt Cards

Raising Oranges


This is another cute little project from the Curves class I am participating in. (Check out Bibs and Scallop Bunting)  I have unfortunately been busier the last few weeks than I thought I would be so I haven't had a ton of time for the projects.  But luckily a few of the projects have been quick ones.  Gotta love that!
I love the idea of these cute little cards.  I've never been in to making my own cards, but I like the personal touch of them.  Now I can accomplish my own personal touch with these cards!  And they are a great way to practice Improv Curves.


I've only made the two so far, but I see many more of these in my future...

Linky Followers Blog Hop


If you are a blogger or visit blogs often I am sure you have heard that GFC is going away for all self hosted sights March 1st.  With blogger soon to followI am sharing this blog hop here for anyone who wants to join up and find new followers though the Link Followers tool.  


Here is what you need to know: 


1. you MUST have the LINKY FOLLOWERS tool on your site to participate.

If you see that your link has been deleted you need to add the LINKY FOLLOWER tool to your site and then come back over and re-enter your link
{You can have both the LINKY FOLLOWERS & GFC on your site but you must have the LINKY FOLLOWERS toolto participate in this party hop.}

2. You MUST follow the person who has the party on their site as a thank you.

3. Just add your blog button to the LINKY PARTY below.

4.Then grab the BLOG HOP code


5. Then you follow other bloggers–(as many as you want)


You will find the code right under the Linky Party where it says CLICK HERE TO ENTER–just under that it says: WHAT IS A BLOG HOP? GET THE CODE HERE. Click on GET THE CODE HERE and enter it into a post on your site. You can grab info from my post if it helps you with your post.


Wednesday, February 22, 2012

Labor of Love Story

Hey Friends!  Today I'm sharing my Labor of Love Story over at The Grant Life.  I'd love for you to go check it out.  Kelley has a great feature going on over there where there are several of us that have formed The Mommy Panel.  We're sharing the stories of how our cute little ones were born and once a week share answers to mommy questions.

Go check it out!
 http://www.thegrantlife.com/p/mommy-panel.html


Monday, February 20, 2012

Pro Deo Pro Patria


My hubby bought this painting for me several years ago for Christmas.  It's one of my favorites.  It's been hanging on our wall ever since, but recently I've been trying to do more decorating around it.  I'd seen several projects were people secure a few boards together then paint a saying on them.  I liked the look and the project seemed easy enough so I thought I could do one to go with the painting.  However, I couldn't decide on a saying.


One day, like a flash of inspiration, it hit me.  "Pro Deo, Pro Patria"  As I've mentioned before my husband is in the military and this saying is his unit's motto.  It means, For God, For Country.  It's perfect for this painting!


This was an easy enough project.  I used boards that my husband brought home from work.  They were just throwing them away.  I used left-over stain from the chair I refinished.  All I had to buy was the mending plates to secure the boards together, 12 screws, the white paint, some letter stencils, and stencil glue.  I'm not lucky enough yet to own a Circuit or Silhouette, so I have to rely on the old fashioned type of stenciling. :)

Let me say I forgot how much I dislike stenciling.  I stink at it!  At first I just taped the edges of the stencils and used acrylic paint.  BIG MISTAKE!  I had major paint bleed.  I tried scraping and a few other things to fix it, but it wasn't working.  So I resanded the board and restained it.  I wasn't about to make that mistake again so I bought some stencil paint (it has a creamy texture) and stencil glue.  So much better!


I still had a few places where I got paint outside of the stencil, but nothing like the paint bleed I had before.  On the places where the paint was light I was able to put a little stain on a cloth and rub it over the paint.  It covered it up great!  Then on the places where there was thicker paint, I would put some stain over it, let it sit a few minutes, then rub with the cloth to blend it in.  I was so happy it actually worked!  There are still a few places where there is faint paint, but nothing bad!


Now my sign is happily setting above my George Washington painting.

Happy President's Day everyone!

Saturday, February 18, 2012

Denim Rag Quilt

www.thegrantlife.com


My hubby had a brother get married last May.  I decided to make them something for a wedding gift and decided on a denim/flannel rag quilt.  So I did a little inquiring and found out they planned on getting a queen sized bed.  I'd never done a rag quilt that large before, but decided it would be a good challenge.  Bring it!  Right?!


This brother has dreamed of being a pilot for the Air Force his whole life, and was pursuing that dream through the ROTC.  I decided to use blue denim and red and white flannel for this patriotic boy.  I started to make my sandwiches and played around with the layout.


About the time I had enough sandwiches made I found out they had changed their plans and were now getting a KING SIZED BED!!  Yikes!  So I calculated, and schemed, and scratched my head.  I calculated what kind of border I could add, how much extra it would cost.  Ouch -- all of the calculations and numbers were hurting my head!  I couldn't believe how much extra it was going to cost to increase the size.


So I compromised.  I made it large enough to cover the top of a king sized bed, but not hang over the edges.  I was still one HUGE beast to sew together in the end.  After I had all of my squares sewed into rows, I sewed the rows together into two big halves.  Then I called on my hubby and he helped support the weight of the two halves as I sewed them together and sewed around the edges.  It was still insane to maneuver even with his help!


I wanted it a little more personal so I had my dear friend Amy, from The Lily Pad Shop do a custom embroidered square for me.  She does great work!  You should check her out. :)


Wednesday, February 15, 2012

I'm Alive!

I feel like I've dropped off the face of the earth as far as blogging is concerned.  The last week has been crazy with a business trip, a sick little girl (she had a fever JUST below the GET HER TO A DOCTOR stage for about a day), and preparations for another trip that I am leaving on tomorrow.  All of this hasn't left much time for blogging or working on projects.
Poor kid...
I have finished two projects this week, but rather than stay up late editing pictures and writing posts, I'm going to have some me time and spend some time with my hubby once he gets home.  (He's working late tonight.)


So I just wanted to drop in and say hi!  I promise next week I'll have some fun projects to share with all of you!  (And I have a scheduled post that I did a week ago that will publish on Saturday.)

Saturday, February 11, 2012

Bibs!

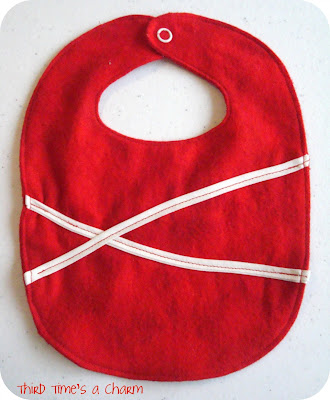
Our second project for the Curves class I am participating in (see Scallop Bunting post) was bibs.  I've been determined these first few projects to use materials I already had on hand.  The bibs were to be made out of flannel and as I dug through my flannel stash I realized it's all red, white, blue or Christmas.  :)  Not much variety...  And much of the red, white, blue toned flannels are already cut into squares for rag quilts and OF COURSE the squares are not big enough for the bib pattern.


Oh well!  I made due and managed to make two cute little bibs.  Rachel from Stitched in Color does some great tutorials for the class projects.  I'm excited to see what's to come in the next few weeks.
These bibs are definitely too small for my 20 month old (they're more for 0-6 months), so I plan on making a larger pattern out of a bib we already have and making a few for my little girl.  We could use some that cover more than 4 inches of her torso which is what most of her bibs seem to be accomplishing these days...  I know plenty of people having babies these days so I'm sure I'll find a home for these two.
But again, this was a fast, fulfilling project.  So nice!  Two quick projects in a row!  I did run into some trouble putting the snaps on.  I've never put snaps on, and I buggered up a bunch of the prong pieces trying to make it work.  Sheesh...I guess my blog isn't called Third Time's a Charm for nothing!  (As far as the snaps were concerned it was more like the 10th Time's a Charm.)

Wednesday, February 8, 2012

Scallop Bunting

I'm taking part in a Curves class through Stitched in Color.  We're only a few days into it, but I think it's going to be GREAT!


This week we are working on basic curves so today I got to make a scalloped bunting.  The instructor, Rachel, said it would be an easy project and she didn't disappoint.  It just took me a little bit of time this morning and this afternoon, and it was DONE!

I'm so happy to have finished a project today.  I needed some project instant gratification.  I have too many going on that are sssslllllooooowwww going.  So nice to have such a quick start to finish time on a project.  Aaahhhh...


I chose to do it in yellows, and grays, because one day I hope to decorate my little girl's room in those colors.  Right now she is in the nursery downstairs, but when baby #2 is on the way I'll be moving her to a room upstairs.  I've already started to refinish some furniture for her room and bought some material for cushions, but it's so nice to have a finished project for the room.


Know what else is great about this project?  I used materials from my stash.  Yep.  For once I didn't buy new material for a project.  :)  I would have loved it with a soft yellow bias strip along the top, but didn't want to take the time to go to the store so I settled with the white.  I used yellow thread though to sew the scallops to the bias tape.  It was my little compromise.

Thanks to Rachel for holding such a great class!

Saturday, February 4, 2012

Tutorial - Crochet Flowers


Several months ago my sister told me about some cute crochet flower and headband sets at Walmart.  You could buy them separately so you could mix and match colors.  After taking a quick look at them I thought, "I can do that."  So here is a tutorial for the flower portion!  I’d like to do the headband portion as well, but I can’t find them in Walmart anymore and I don’t know if my memories that good.  We’ll have to see…


It's an easy and quick crochet project.  Enjoy!

CROCHET FLOWER
Pattern Notes
Pattern uses a size F/5 (3.7MM) hook and light weight (#3) yarn.
Ch 3 counts as first stitch
(Variations of flowers are shown at the bottom using different hooks sizes and a variation in stitches.) 

Abbreviations
ch – chain
sc – single crochet
dc – double crochet
tc – treble crochet
st – stitch
sl st – slip stitch
sk - skip

R1: Start with a *magic ring.  Ch 3 in the magic ring then 14 dc.  Pull the ring tight. (15)

*If you are unsure of how to do this, here is a great tutorial.  If you’ve never used a magic ring for crocheting in the round before I highly recommend it as it makes that center hole MUCH smaller.

R2: ch 3, dc in same st, 2 dc in each stitch around. Join with sl st in top of beginning ch 3. (30)
R3: ch5, *sk 2 st, sc in next st, ch 4* repeat * section around.  End with sk 2 st, then join with sl st in first st. (10 arches)
R4: *5 tc in first arch, sl st in sc* repeat * section around. Join with sl st in base of beginning tc. (10 scallops) See note at very bottom to understand why it is important to join in the base of the beginning tc.

Finishing Off: trim and weave in ends.  You can then attach whatever kind of hair clip you’d like to them, or put them on a scarf, head band, bags, the sky's the limit!


VARIATIONS FROM PATTERN ABOVE

1. Uses size G hook.  R1 - 16 stitch count.  R2 - 32 stitch count.  R3 - 11 arches and dc in place of sc.  R4 - 11 arches and scallops.*
2. Uses size G hook. R3 - dc in place of sc.*
3. Uses size G hook.
4. Done using original pattern above.


*You'll notice each of these flowers have a scallop that stick our above the rest.  That is because on R4 I joined the last scallop at the top of the first tc rather than the base.  I learned.  And know you can learn from my mistake too!