Wednesday, December 28, 2011

Charlotte Baby Quilt

I'm loving quilting, but I'm having a hard time justifying the cost.  I mean, how many blankets do we need?  However, if I make quilts as gifts, then it's okay, right?  :)  So my second completed quilt was a little baby quilt that I mailed off to a friend for her little girl.  It was much harder than I thought it would be to give it away!


The pattern is "Charlotte" from Three Times the Charm which you can find here or Amazon.   (It's cheaper shipping through Amazon.)  I added another row to make it a little larger.  The pattern calls for the octagons to be a neutral color, and the in between space to be the patterned material.  I decided I wanted to change it up a little and swapped it.


This is only my second time doing free-motion quilting, and I decided to try a different pattern.  I did a modified dogwood pattern.  You can find directions for it here at Oh, Fransson!  I didn't want the lines between, so that is where the modification came in.  I would leave one section of the flower open then more on to the next one.  Once I made it through the whole thing I made my way back to the beginning by closing up each section.  It worked great!


I hope my friend and her little girl enjoy it!


Thursday, December 22, 2011

Why do I sew?

My little one L.O.V.E.S. stuffed animals.  She talks to them, tickles them. has us tickle them, gives them kisses, and uses them to "get" us.  So imagine how sad I was when one of her favorites split a seam.


Poor Bear!
This bear has been the victim of many hand-washings which probably caused the split seam.  He's looking pretty rough these days. :)  It took me a while to get to him, but I finally sewed him up the other day.  I'm so glad I have the resources on hand (I know it doesn't take much) and I'm not intimidated by a thread and needle (I would have been a few years ago).


Reunited!
So she can have a "whole" bear once again.

Merry Christmas!


Tuesday, December 20, 2011

Crocheted Long Stocking Cap

**Update - the tutorial is now up.  Check it out here.**

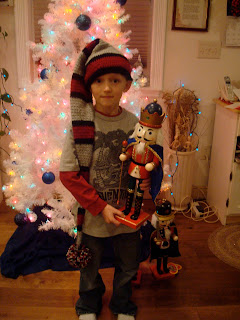
When I asked my sis-in-law what her 9 year old would like for her birthday, she didn't hesitate before answering "a VERY long stocking cap with a yarn ball on the end."  After searching online I didn't find any crochet patterns that I liked so I decided to see what I could come up with.


I've crocheted quite a few hats so I had a basic idea of what to do.  I just started with a much smaller first round and very gradually increased it.  I love how it turned out, and my nephew loved it too.  In fact, his older brother has now requested one for his birthday in January.

I know he isn't smiling, but I promise he likes it. :)
It ended up being three feet long!  It went past his waist.  As long as his head doesn't grow too much it should last him for quite a while!

Indy had to try it on before we gave it to him.
I'm going to clean up my notes while I make the second one.  Then I'll post it as a free tutorial on here.  Keep an eye out for it!

Monday, December 12, 2011

Embroidery Hoop Christmas

One day I plan on using embroidery hoops to decorate my little girls room, so I've been picking them up at second hand stores whenever I see them.  I came upon my stash in a closet a while ago and started brainstorming how I could use them for Christmas decorations, and here's what I came up with.

Meet Mr. Snowman


Different sizes of embroidery hoops, circles, winter...a snowman, of course!  I think the hat is my favorite part.  I used a cashew can, and a random plastic lid I found in my cupboard.  I cut them both in half and covered them in felt.  I think he's got personality!  My little one definitely likes him. :)


Add some buttons, pom poms, a felt nose, and ta-da!

Fabric Snowflakes


At first I thought it would be cool to have just the snowflakes stretched through the hoop with no background.  Then I decided that would be a nightmare to make work, so I settled on some contrasting  material to put them on.


I found that using starch on the material helped.  It also helped to place some pins in it to keep it folded while I was cutting the snowflake.  I would also recommend using THIN material.  It gets to be a lot to cut through after you fold it several times.  You can find TONS of templates and ideas for cutting snowflakes online.  I decided to use some of the six point patters that I found.


I used some spray on fabric glue to put them on the background.  It worked great!  Some parts of my snowflakes weren't staying together because I cut too far, but I was still able to use them.  Once I glued them on you couldn't tell some of the snowflakes were in pieces.

I think I want to add some sort of garland around them to make them look more finished, but I haven't gotten to that yet.

Goldilocks and the Three Slouchy Crochet Hats


This is the story of Goldilocks and the Three Slouchy Crochet Hats.  When she was fairly new to crocheting she found an adorable free pattern here and decided she'd give it a try.  The pattern calls for cashmere yarn, but Goldilocks couldn't find any.  So she decided to go with an extra bulky, heavy yarn hoping that the weight would create the drape effect.

It didn't.  Luckily before she got too far, she realized her choice of yarn was resulting in too stiff of a hat.

Partial hat with thick yarn that made it STIFF


Then she found a wonderful super soft yarn that she thought would work well.  She worked and worked on the hat and was pleased with its progress as it came along.  When she finally finished the hat she was a little worried though, it looked a little small.  The hat was intended for her adult sister, but it didn't look like it was going to fit her.  Maybe her daughter?  No.  The hat wouldn't even fit Goldilocks' little girl that was less than one year old at the time.  Can we say doll clothes?


So she found a different yarn and tried again.  Success!  Finally an adorable hat that would fit an adult and that wasn't super stiff!


Thanks for putting up with the Goldilocks story.  It seemed to fit this escapade.  This is a pretty simple pattern that goes quickly.  I just finished another one for my sis-in-law.  I still can't find any cashmere yarn, but I used Lion Brand Jiffy Acrylic (Bulky weight) this last time and it worked okay.  I use the larger needle the pattern calls for and add the extra round.  I'd still love to get my hands on some cashmere and give it a try.  It looks so smooth!

Sunday, December 11, 2011

Christmas Ladder


I saw a tutorial on how to make your own decorative ladder on Tattertotsandjello.com and I had to give it a try.  I've always loved the looks of using ladders to decorate, but never wanted to fork out the money for one.


I've decided to use mine to display holiday photos and Christmas cards.  I bought the ornaments from a dollar store to keep the decorations fairly cheap, but I did break down and buy the garlands from Joanns.  At least they were 60% off!


Here are a few tips if you decide to make one.  Learn from some of the difficulties I had when I made mine. :)

1. If you don't have one of these doo-dads (a center punch),  get one.


They are great for creating a little indentation for the place you want to drill.  It makes the placement of your hole more precise rather than the drill bit dancing around on the wood before starting to penetrate.

2. Pay closer attention to her tutorial then I did.  :)  I didn't notice that she said to use screws to attach the dowels to the 1 x 4x so I used wood glue first.  Messy and it didn't work as well. :)

3. Use white screws if you have them.  I only had dark grey ones on hand and the paint didn't cover them up as well.

4. Very carefully drill the holes for the screws to make sure they go in straight.  Otherwise the screws will start to push out the side of your dowels.

3. If you use grey screws, put them in a little further than flush with the wood.  (So they are depressed in a bit.)  Then putty over them and sand the putty once dry.  It will help the paint cover them better.

4. I'm fairly new to crafting and haven't "distressed" many things.  So I found some tips that helped me.  A) Sand the areas that would naturally get worn through time and use.  B) Use 60 grit sandpaper first to rough it up then go over the same spots with 120 grit sandpaper to smooth it out.

Enjoy!

Wednesday, December 7, 2011

Log Cabin Quilt Top

It's done!  Well, at least the quilt top is done.  But I was so excited I made it this far I had to share.  In an earlier post I showed you the beginnings of my Log Cabin Quilt top.  It was going to be throw size, then I decided I mind as well make it big enough for a twin.  I'm very happy with how it's turned out so far!


The borders made me nervous.  I knew doing borders incorrectly could end in a skewompous quilt.  And I didn't want that, did I?  So I consulted friends on Facebooks.  I consulted friends through email.  And I went into my local quilt shop and one of the sweet ladies there drew me a diagram and taught me how she did it.  :)  I wanted to have two borders on top and bottom (like on the sides), but it was getting too big and I would have had to trimmed most of the top border off anyway.

Now I need to put this project aside while I work on some gifts.  I'll have to finish the back and quilt it later.

Project linked at Freshly Pieced.

Tuesday, November 29, 2011

Christmas Wall Hanging

After I finished my first quilt I decided it would be fun to do a Christmas quilt wall hanging so I started looking around for patterns.  I came across the Little Forest Quilt on the purl bee and thought it would be perfect for my new quilting skills.  (And it's free!)

It's a great project for scraps, but that didn't stop me from cutting little bits off of large pieces of material.  What can I say, my scrap collection is small at this point.  :)  It came together so quick!


I decided to do a scrappy binding and love how it looks.  I also tried my hand at ditch quilting, and was surprised at how tricky it was.  I mean, come one, how hard is it too sew a straight line?  Apparently pretty difficult.  :)


I'm still playing around with different branches.  I can't find one I'm thrilled about.  The pattern also suggests using a large knitting needle to hang it, but I couldn't bring myself to spend the money on one, even with a 50% off coupon.  

Saturday, November 26, 2011

Baby Afghan - Finally Done!


These Peas Taste Funny


So the baby afghan I introduced in this post is FINALLY DONE!  I checked the calendar and it took me two days shy of six months to complete it.  What an endeavor!  Of course there were plenty of other projects started and some finished within that time.


I LOVE how the diamond pattern turned out.  I may try to make up a beanie using the same braided loop idea.  And I'm very happy with my choice of blue for the edging.  It will work great for a little boy or girl.  This is the largest crochet project I have taken on, and I am so excited it's done!


 When I initially started it I was going to give it away as a present.  The baby that it was intended for is now almost a year old, and this blanket is probably too small.  I think I'll keep it for our baby #2 whenever it decides to come along.

My husband asked me what I was going to do now that it's done.  Silly man.  I have so many other projects lined up!  Next, a slouchy hat for my sis-in-law.  I've already made one for a sister.

Wednesday, November 23, 2011

Log Cabin Quilt - The Beginning

A few months ago I found some fabric I loved at my local quilt shop, Village Dry Goods.  I loved it's mellow colors.  I left it on my work table so I could constantly be thinking of what to do with it.  I didn't want anything too busy.  Then I found this Monaco Log Cabin quilt on Maiden Hair Fern.  I LOVED it!!  I loved the use of the white sashes to give is a less scrappy look.  So I went to work on my quilt top.


I initially just planned on making it a 3x3 throw size.  The squares are large - 16 inches - so it would be roughly 4 ft by 4 ft.  But once I got this far I started thinking that it would be a shame if I put all of this work into it and didn't make it at least twin sized.  So I've six more squares to make it 3x5 and will soon add two borders.  Hopefully this isn't too ambitious for my second quilt!

Saturday, November 19, 2011

Christmas is Sneaking in...

I love - L.O.V.E - Christmas.  There are years when I start listening to Christmas music as early as August, because one month of it just isn't enough.  This year I resisted until Halloween day.  That's good for me!


The last few years on the day after Thanksgiving my husband and I have gone and tromped through the mountains and cut down our own Christmas Tree.  He's not big into Christmas so it's been a good way to create a tradition that we both enjoy.  I then spend Saturday decorating the tree and the house.  This year I couldn't wait that long so Christmas has slowly been sneaking into the house. :)


Here's a centerpiece I just created.  My mom gave me the lamp a while ago - I think it's from Lillian Vernon.  I bought the glasses from the DI (a local secondhand store), and the poinsettas from Joanns.  I also had the tray sitting around.  I saw a tutorial on tatortotsandjello.com on how to make a centerpiece tray from bead board and molding, but I lucked out and already had one on hand.  What do you think, do you like it?  I'm still trying to decide.  The pine cones are the cinnamon ones so my kitchen smells YUMMY!


The two pictures above are of my mantle.  I still might add a thing or two.  How do you like the flag?  My husband doesn't give much input on decorating, but he likes to have the flag on the mantel.  I can't say I blamed him.  It's well earned!


And here's a simple shelf.  I made the Joy at a church event and got the lantern at Shopko.  Love the lantern!

I also got out our Fischer Price Nativity Set and Rudolph the Red Nose Reindeer characters for the little one to play with.  She's loving them!! 

Merry Christmas!

Tuesday, November 15, 2011

Christmas Rag Quilts

About two years ago I had a brilliant idea.  I was going to make Christmas rag quilts for each of my siblings families and one for my parents.  That's seven rag quilts.  It was during the beginning of my sewing experience so basic rag quilts were the extent of my skill.  Great idea, right?

Here they all are!  The four on top have actually been
"ragged" and washed.  They're throw size, about 4 ft x 4ft.
I bought the material (oh how quickly the cost added up!) and went to work.  I loved it and had so much fun at first!  Then the problems started.  I was pregnant and something - the smell of my sewing room, the heat upstairs, the smell of the material - was making me nauseous.  I tried to push through, but it wasn't happening.  So they got put on hold for a while.

I started working on them again during my second and third trimester and things went much better!  But then my baby came and time grew short.  I'd work on them here and there, but they still didn't make it done for the next Christmas.

Here's one of my favorites.
Here we are three Christmas' later, and they're all sewn together!  Yay!  I have four of them "ragged," and  I'm slowly working on the other three.  They've actually been sewn together for months, but I've had a hard time finding the motivation to rag all of them.  Any volunteers?

And another favorite.
My sibs may actually get them as presents this year. :)  Now I just have two problems.  1) I want one.  2) How do I decide who I give which one?  I need to decide quick, because I need to get one in the mail!

Saturday, November 12, 2011

A Great Learning Experience - Toddler Vest & Hat


A friend borrowed some patterns for infant/toddler clothes to me.  One was Simplicity Pattern #5316   which included an adorable hooded vest and winter hat.  I found some cozy giraffe print fleece at JoAnns, and went to work.

I started with the hat and it came together pretty quickly.  It was my first time working with patterns using notches, so it took me a few minutes to figure them out, but otherwise it was a simple pattern.  (Not that notches aren't simple, they were just new to me.)

Then I moved on to the vest.  It's a cute little hooded vest with pockets on the front.  It was a FANTASTIC learning experience.  It was my first time sewing a hood, pockets, working with bias tape, and adding a zipper.  I was happy with the results!


Playing in the first snow of the year.  There wasn't much, but
we made it count!

Friday, November 11, 2011

A Veterans Day Post

Happy Veterans Day!  I'd be remiss if I didn't take a minute to thank all of those who have served our country.  All that have signed their name on the line not knowing how, where, or when they would be answering the call, but they were willing to do it all the same.  When I think back on our history I am amazed at all those who sacrificed so much to give us The Land of the Free.  When you look around the world at other countries, that is an amazing title to bear.  The Land of the Free.  It means so much.

My grandpa Anthony Marrone served in WWII.


My grandma married him during this time.  Who could resist that handsome Italian in uniform?  Sadly we can't find much of his clothing, medals, documents from his service, and he passed away in 1980.  My mom and I have made it our mission to find all we can.

And of course there's my favorite Veteran, my hubby.  He's been in the Army National Guard for 12 years, and worked full-time for the Guard for almost three years now.  He doesn't do it for the recognition, in fact he hate's the attention he gets from his service.  It's what he always wanted to do.  He played army as a young kid and almost always had some sort of camouflage on.  When we talk about the possibility of him changing units for a promotion or other reasons, he won't do it.  He doesn't want to leave the guys that he's served with for so long.  That's the main reason he serves, for his buddies.  If he volunteers for a deployment, it's because he can't stand the thought of not being there for them when things get rough.

I love the last line of Flags of our Fathers (the movie).
"Heroes are something we create, something we need. It's a way for us to understand what's almost incomprehensible, how people could sacrifice so much for us, but for my dad and these men, the risks they took, the wounds they suffered, they did that for their buddies. They may have fought for their country but they died for their friends. For the man in front, for the man beside him, and if we wish to truly honor these men we should remember them the way they really were, the way my dad remembered them."


This is the day he got home from his second deployment.

Wednesday, November 9, 2011

My First Quilt

Featured in Pink Chalk Newsletter 12/17/2011
&


mop it up mondays feature


About nine months ago a friend introduced me to the blog Cluck Cluck Sew and put the idea of quilting into my head. I decided I would start with a quilt for my little one who was just eight months old at the time. I purchased the Juice Boxes pattern from Cluck Cluck Sew, signed up for a Quilter's Kindergarten class, and made a trip to my local quilt shop, Village Dry Goods. After making a considerable dent in my wallet I returned home excited to start my project, but decided to wait till I went to the class.


The quilt went slow with a little one underfoot and because I was working on a denim rag quilt for a brother-in-law's wedding. After I basted the quilt I decided to give free-motion quilting a shot (AH!). The quilt sat waiting to be quilted for a while. I was trying to work up the nerve to do the free-motion quilting. I studied the tutorial "Finishing a Quilt" at Cluck Cluck Sew (can you tell she got me through this quilt!) many times before attempting anything. And guess what?! It wasn't so bad! I did the meander pattern and had a few sharp corners, but overall it went well. My biggest mistake was I forgot to put the foot down a few times, which led to some unpicking. :)

Close-up of the quilting, don't look too close. :)

Here are a few tips for free-motion quilting in addition to Allison's.

  • While it is ideal to start/stop quilting on the excess batting at the edge, that wasn't always possible when I had a one year old tugging at my legs. I learned it worked best to stop on a square the same color as my thread. That way if I didn't have a smooth start, it hid the mistake better. 
  • When restarting quilting in the middle of the quilt anticipate the direction you want to move before actually starting. This led to a more seamless start/stop.
  • Practice quilting on several sandwiches sewn together rather than just one sandwich. This helps you get the feel of going over seams. 
  • Be patient and relax! 
 This is the quilt that started my addiction!!  Quilt number 2 is in the works as we speak. :)